Thursday, September 27, 2012

Chocolate Mint Sandwich cookies

A few weeks ago, one of my dear friends was having a hard time, so...we set up a time for lunch the next day. I asked if she wanted anything and she replied, "something chocolate!" hmmm chocolate...that should be easy! :) I wanted to make something new, so I consulted my trusty Martha Stewart cookie book to see if there was something in there I could make and I came upon a recipe for Chocolate Mint Sandwich cookies. There was a few steps, but it looked yummy..and very chocolaty...sure to satisfy the chocolate requirement and hopefully would bring a smile to her face! :D The cookie itself was kind of dense and bitter, so I was a bit worried about the rest of it. But after I put all the components together..wow!! They were delicious!! They totally reminded me of the Girl Scouts Thin Mint cookies. MMMMMM, one of my favorites!!! Very rich and chocolaty..so be sure to have a glass of milk nearby!! A definite treat to cheer someone up!!!


Makes 3 dozen cookies

For the Cookies
-1 cup unsweetened Dutch-process cocoa powder
-1/2 cup plus 2 tablespoons all-purpose flour
-1/2 cup (1 stick) unsalted butter, room temperature
-1/2 cup granulated sugar
-1 large egg, room temperature
-Confectioners' sugar, for work surface

For the Ganache
-1/4 cup heavy cream
-6 ounces semisweet chocolate, very finely chopped
-3/4 teaspoon pure peppermint extract

For the Glaze
-6 ounces semisweet chocolate, very finely chopped

Directions

Make cookies: Whisk together cocoa powder and flour in a bowl. Put butter and granulated sugar in the bowl of an electric mixer fitted with the paddle attachment. Mix on medium-high speed until pale and fluffy, about 3 minutes.


Mix in egg until well blended. Reduce speed to low. Add flour mixture; mix until just combined.


Divide dough in half, and shape each half into a disk; wrap in plastic. Refrigerate until firm, about 1 hour (or overnight).


Preheat oven to 350 degrees. Transfer dough to a work surface lightly dusted with confectioners' sugar. Roll out dough to 1/8 inch thick.


Cut out cookies using a 2-inch round cookie cutter; space 1/2 inch apart on baking sheets lined with parchment paper


Repeat with remaining scraps of dough. Bake cookies until firm, rotating sheets halfway through, 10 to 12 minutes. Let cool completely on sheets on wire racks. *these cookies kind of made a small dome after baking. I'm not sure why. But it didn't really matter once you dunk them in the chocolate glaze. It just bothered me when it came out. Because I'm a perfectionist. HAHA. they're a bit crunchy, and a bit bitter when eaten by themselves, but don't doubt the cookie just yet, which I did...wait, until the whole thing is complete.

Meanwhile, make ganache: Bring cream to a boil in a small saucepan over medium-high heat. Add chocolate. Cook, stirring constantly until chocolate is smooth. Stir in peppermint extract.


(I didn't have any peppermint extract, but had some peppermint oil. I used that but makes the consistency of the ganache a bit oily..so stick with the extract!!) Let cool slightly, 10 to 15 minutes.

Spoon 1 teaspoon ganache onto the bottom of 1 cookie; sandwich with another cookie. Repeat with remaining cookies and ganache.


Refrigerate until firm, about 10 minutes. *Due to time constraints, I didn't stick them back in the fridge, I immediately dunked them in the glaze, which turned out great still!

Make glaze: Melt chocolate in a heatproof bowl set over a pan of simmering water, stirring constantly (or melt in microwave in small increments like I did..much easier! :D). Let cool slightly. Dip one flat side of each sandwich into melted chocolate to coat; gently shake off excess. Place sandwiches, chocolate sides up, on wire racks set over baking sheets. Refrigerate until set, about 15 minutes. *I wanted the whole cookie covered in chocolate so I dunked them one side first, put them in the fridge, then dunked the other side. It wasn't the prettiest since the chocolate is uneven, but it coated the whole cookie. I might just try this technique next time, since the whole thing is very rich anyways, the bottom of the cookies don't REALLY need the chocolate..


These might have a few steps, but it's not too hard, and the end product is well worth it. I shoved a few in my face before remembering that I had baked them for my friend.. Hope these did it for you K!!! :) enjoy!

Sunday, September 23, 2012

Peanut Butter Protein Cookies

Football season has started..I only know this because I work in a predominately male workforce and they talk about it constantly..and my BF is a huge Chicago Bears fan. He grew up just outside of Chicago. So ever since the end of last season, it was.. "5 more months until the beginning of next season!" I heard it the whoolle time. So when the first Bears game of the season came, I decided to throw a football BBQ party to celebrate the first game! I decided to make Stout cupcakes (recipe to follow :D) and a friend requested peanut butter protein cookies. She's very fit and healthy and I feel bad trying to feed her my baked goods haha, so this is one that is a great alternative. I looked on the internet and found a few recipes, I liked this one the best from Fitness and Spice website http://www.fitnessandspice.com/2010/12/peanut-butter-protein-cookies/. They taste like peanut butter cookies and only have 5 ingredients! Pretty good.


Peanut Butter Protein Cookies

1 Egg (or Egg Beater)
1/2 cup Sugar Substitute (I use Splenda)
1 t Vanilla Extract
1 cup Natural Peanut Butter
1/2 cup Vanilla Protein Powder

Whisk together the egg, sugar substitute, and vanilla. Stir in the peanut butter and gradually mix in the protein powder.


Drop by the teaspoon onto a prepared baking sheet,


flatten dough with a wet fork to prevent sticking,


and bake at 350 degrees for 10-12 minutes. Makes 2 dozen cookies.


It's not your usual baked sweets, but, this one's actually good for you! :D Enjoy!
(do you notice that these pictures are different than ones prior? That's because they're taken with my new camera and lense! I'm just getting used to it and playing around with it, so forgive me if these pictures are perfect yet! or..the ones forthcoming! :D)

Tuesday, September 4, 2012

Kwok baby shower!

So it's very exciting when your friends start getting married. And it gets more exciting when they become preggers and have babies! I love watching us all grow up and get married and start having our own families..well, actually. I still like to think of myself as a kid. :) Last Labor day, I was a bridesmaid in the wedding of a dear friend..and this Labor day, she's expecting and due 11.11! I couldn't be more excited for her dragon baby and even more excited that she allowed me to bake for her shower!

Her shower had a penguin theme and a lavender and a hint of yellow color scheme (yes I told her that reminded me of the Lakers too but she didn't mind, since she LOVES the Lakers anyways..haha). Here's her invitation:


Isn't it adorable?

She requested a dessert bar and her bestie did an awesome job of making the signs, getting those huge round balloons, [which I absolutely LOVE LOVE LOVE..but BF refused to let me take it home, calling me a hoarder :(] and getting the purple/lavender candies.

The frosted bags with custom tags to stuff the goodies in..


I made:

Double chocolate chip pecan cookies, Snickerdoodle cookies.
(sorry photos not available!!! hopefully will get them from someone :D)

Vanilla butter cookies,


I always have in my head decorating these cookies all pretty with 20 different colors of icing, like I see on the internet. When it comes down to it, it just seems like so much work mixing and getting the right consistency and coloring and have 20 different bags of icing all over the place (as if I don't already make enough of a mess baking)..so I've been ending up decorating them with fondant. It's so much easier to me, than trying to hold my hand steady to pipe all those lines and colors onto a little cookie. I wish..maybe one day...I dream to acheive. :)

.. and red velvet penguin pops.


yes, at first glance it looks like a monkey, but look closely!! :) I was trying to make them look like the penguins from the invitations. I shaped them into ovals, dipped them into a custom mix of white and purple candy melts to achieve the lavender color...I piped royal icing for the tummy, fondant feet and nose, black royal icing for the eyes and piped more lavender chocolate for the flappers. or flippers. wings? hands? What do you call those on penguins!?

This is the entire candy/dessert buffet table. The bestie also ordered some personalized M n M's with the penguins printed on them as well as "mommy astra" and "daddy william." It was too cute.


I wish them both the best and can't wait to meet baby!! so so excited!!! :D

Brown Sugar Pound Cake with Brown Butter Glaze

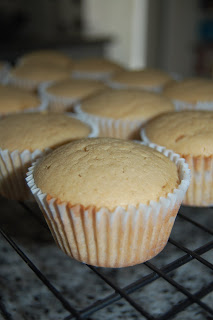
I had some buttermilk left over from a baking job (buttermilk is expensive!!) so I consulted my trusty Martha Stewart cupcake book to find a new cupcake recipe to use it up. This recipe for brown sugar pound cake jumped out at me because 1) it used buttermilk, 2) it was a simple recipe because I was also in a time jam and 3) the brown butter glaze just sounded sinfully delicious. This pound cake is rich and a little bit dense, but more tender because of the buttermilk. The brown sugar gives it a hint of a caramel flavor and the glaze, also a nutty caramel flavor, a bit on the sweet side, but is the perfect compliment to the pound cake. Be careful. Keeping them around might make you gain a few pounds. :) Delicious.


For the pound cake:

Ingredients

-3 cups sifted all-purpose flour
-2 teaspoons baking powder
-1/2 teaspoon salt
-1 cup (2 sticks) unsalted butter, softened
-2 1/4 cups packed light-brown sugar
-4 large eggs, room temperature
-3/4 cup buttermilk
-Brown-Butter Glaze

Directions


Preheat oven to 325 degrees. Line standard muffin tins with paper liners. Whisk together flour, baking powder and salt.

With an electric mixer on medium-high speed, cream butter and brown sugar until pale and fluffy.


Add eggs, one at a time, beating until each in incorporated, scraping down sides of bowl as needed.


Add four mixture in three batches, alternating with two additions of buttermilk, and beating until combined after each.


Divide batter evenly among lined cups, Filling each cup 3/4 full.


Bake, rotating tins halfway through, until golden brown and a cake tester inserted in centers comes out clean, for about 25 minutes. Transfer tins to wire racks to cool, 10 mins; turn out cupcakes onto racks and let cool completely. Cupcakes can be stored up to 3 days at room temperature, or frozen, up to 2 months in airtight containers.


Make the brown sugar glaze. Set rack with cupcakes over a parchment-lined baking sheet. Spoon glaze over tops, and let stand until set. Serve glazed cupcakes immediately.


For the brown sugar glaze:

ingredients

-1/2 cup (1 stick) unsalted butter
-2 cups sifted confectioners' sugar
-2 teaspoons pure vanilla extract
-2 to 4 tablespoons whole milk

Directions


Melt butter in a saucepan over medium heat until golden brown or nut brown color, swirling pan occasionally, about 10 minutes.


Remove from heat and carefully pour butter into a bowl, leaving burned sediment behind.
Add sugar, vanilla, and 2 tablespoons milk to butter, and stir until smooth. If glaze is too thick, add more milk. Use immediately.


Spoon the glaze over the cupcakes.


Enjoy!!